
My Cheap Side-Project Tech Stack
Data pipelines on a budget
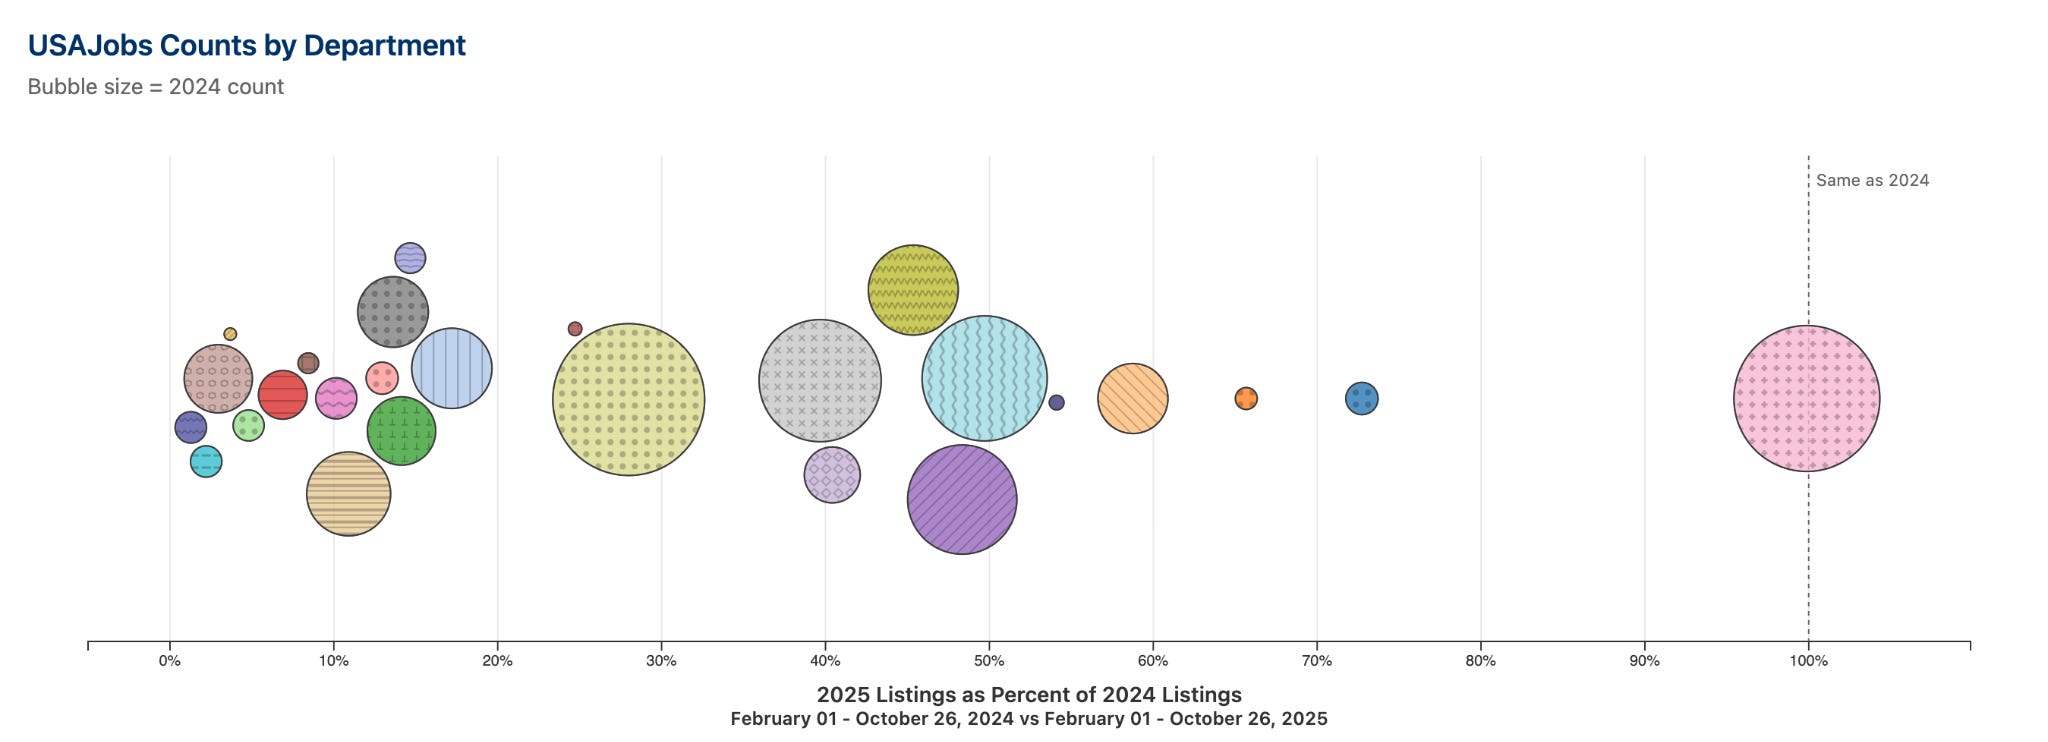
Over the summer, I built out data pipelines that populate websites, mostly with federal jobs listing data from USAJobs.
This was new for me. I’m coming from data science, and I’d built reports which updated regularly and sent emails, but most of them ran inside Databricks—a system someone else maintained, pulling from data tables someone else updated—and they never had their own websites. This was the first time I was building something like this all the way through by myself. At the same time, these were also side projects, and I didn’t want to spend a lot of money on them.
Initially, I just ran the update scripts manually when I remembered. Then I got tired of that and wanted it all online. Then I realized I needed tests because things were breaking and I wouldn’t figure it out until I checked the website—or, worse, someone else told me. My setup came together piece by piece as I needed it.
Here’s where I landed.
GitHub Large File Storage (LFS)
The problem: I had too much data to commit to GitHub the normal way: GitHub won’t let you commit files over 100MB, and my Parquet files with years of job listings were bigger than that. But I wasn’t ready to set up a database—that felt like overkill.
How it works: GitHub LFS stores large files separately and keeps pointers in Git. You tell Git which file types to track with LFS, and it handles the rest.
My implementation: All my big data files go into LFS. When my GitHub Actions workflow runs—more on that later—it pulls those files to process them. This way, the data stays versioned and can live on GitHub.
When to use it: When you’re accumulating data over time and need version control but aren’t ready for a database. It costs $5/month for 50GB of storage and bandwidth; some months I pay more, when people are cloning my repos.
GitHub Actions
The problem: I needed my pipeline to run automatically. Running scripts manually on my laptop when I remembered wasn’t sustainable.
How it works: GitHub Actions runs code on GitHub’s servers based on schedules you set. For instance, you write a workflow file that says “run this Python script every day at 4 AM.” Actions spins up a virtual machine, checks out your code, installs dependencies, runs your scripts, and can push results back to your repo or even create and resolve pull requests to other branches.
My implementation: I have several actions that run daily and a couple that are more infrequent. They check out the repo with LFS files, install dependencies, run the data collection scripts, then run tests.
What typically breaks when I’m first setting these up are dependencies and permissions.
For dependencies, you spell out everything. Not just Python packages, but if you’re web scraping with Playwright, you need Playwright AND the browser AND system dependencies. If you’re calling APIs, you need API keys in GitHub Secrets. Everything your local environment has, Actions needs explicitly declared.
For permissions, the workflow also needs explicit grants to write to your repo or create pull requests. Without these, your workflow fails.
Writing tests: I test what I’m worried might break AND what would be bad if it broke. For instance, my tests check that data files exist, aren’t empty, and have required columns. I don’t have tests for things like my JavaScript filters, because I’ve decided that what I’m most concerned about is data integrity, and I wasn’t quite ready to also add website testing as well.
When something breaks in an unexpected way, add a test for it. When I accidentally deleted some of my data, I added a test that checks for every job listing that was in the files last time this action ran. If a test fails, the workflow stops.
When to use it: When you need scheduled, automated work without running servers. Public repos get unlimited Action minutes. Private repos get 2,000 free minutes per month. Each job has a 6-hour timeout.
Multiple Branches
The problem: I needed stage/prod separation without servers. But how do you test changes when everything happens in the same repository and you have no budget?
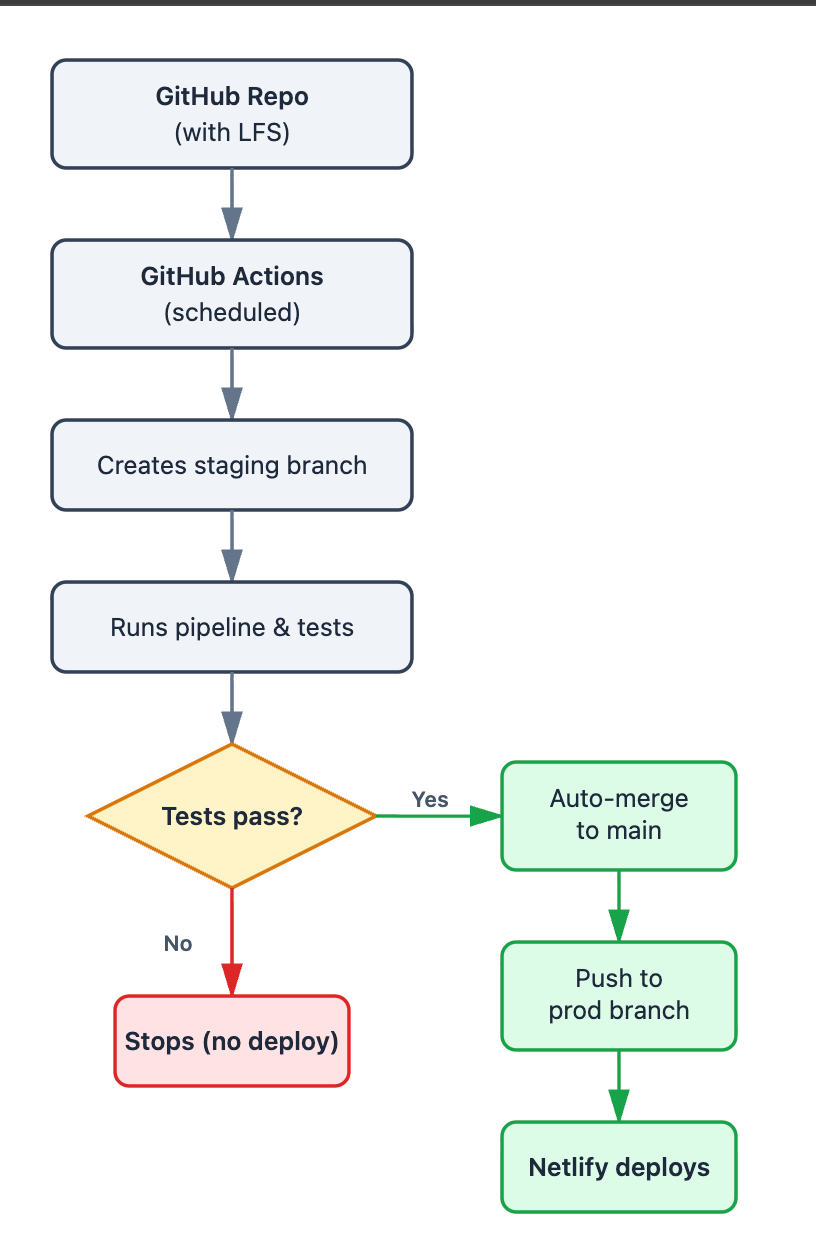
How it works: Use branches as environments. Your pipeline pushes updates to a staging branch. Tests run automatically. Only if tests pass does anything merge to main, then push to a production branch that your website deploys from. (Your exact branch structure may differ.)
My implementation: Each day, my workflow creates a fresh staging branch from main, runs the pipeline, and commits results. Tests run. If they pass, the workflow auto-creates a pull request to main and auto-merges it. Finally, it pushes to my production branch, which my website deploys.
The flow: staging → tests → auto-merge to main → push to production → website deploys.
When to use it: When you need to test before you deploy, but you’re not running servers. The branch-based approach gives you stage/prod separation without infrastructure costs.
Netlify
The problem: I needed to host websites that updated automatically, stayed fast, and didn’t cost money.
How it works: Netlify hosts static sites—just HTML, CSS, and JavaScript files, no backend fetching from a database or running Python. You can set it up so that Netlify watches a specific GitHub branch, and whenever you push to that branch, it automatically deploys your site.
My implementation: Netlify monitors only my production branch. When GitHub Actions pushes there (after tests pass), Netlify builds the site and then deploys. I stay within the free tier.
Static sites are simpler, which means less to break. But there’s a constraint: you can’t load huge amounts of data all at once. Load a 50MB JSON file on page load and it will crawl—or fail outright.
The data split trick: When I have a lot of raw data, I split it into multiple files—one for each filter value. For USAJobs, that means I create separate files with the raw jobs data for each federal department. To see raw data, users must filter by department first, which triggers loading just that department’s file. Each file is small, so it loads quickly.
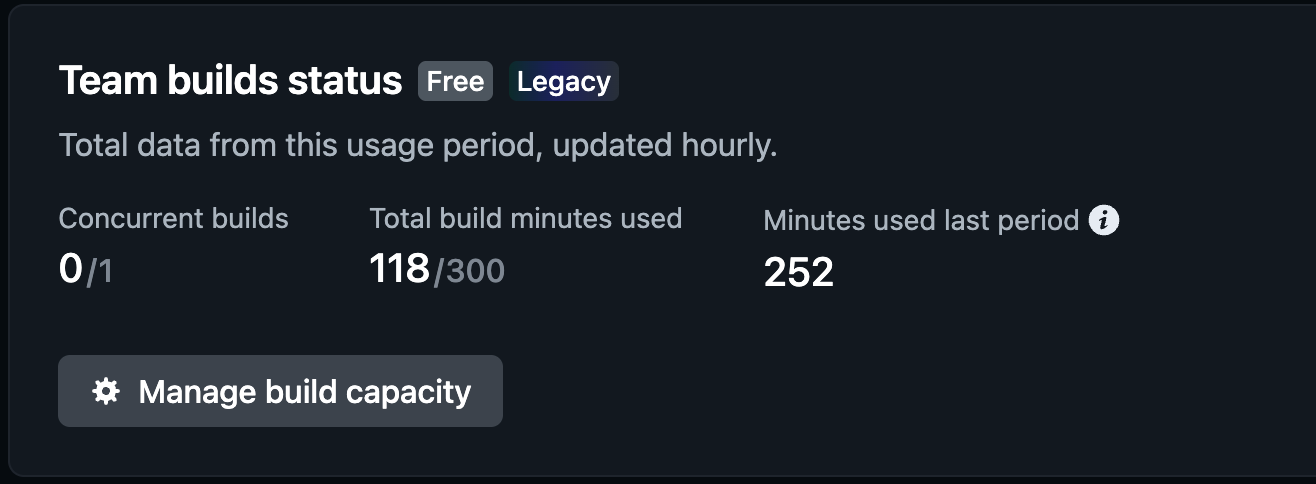
When to use it: When you want simple deployment and don’t need a backend. Netlify’s free tier: 100GB bandwidth per month and 300 build minutes.
D3 and DataTables
The problem: With my sites, I needed interactivity—users filtering data, searching tables, clicking on visualizations. Python can’t run in the browser. JavaScript is what runs client-side, which means it’s what you need for static sites to do anything interactive.
The secondary benefit: I also wanted very specific visualizations. For static graphs, Python has great options. But for interactive web visualizations—bubble maps, filterable charts—I wasn’t happy with what I was able to make.
How it works: JavaScript runs in the browser. D3 is a JavaScript library for data-driven visualizations. DataTables is a library that adds sorting, filtering, and search to HTML tables. The ecosystem is huge: if you need a specific chart or interaction, someone has probably built a component you can use.
My implementation: I use DataTables for tables—it gives me instant search and filter functionality without building it myself. For graphics, I use D3. I still don’t know JavaScript—I use Claude Code to write it1. But I knew enough from Python to recognize patterns like “I should abstract this out because I keep using it” or “use DataTables for search instead of building your own.”

When to use it: When you’re building sites and need interactivity and specific data visualizations. Use existing components instead of building everything yourself.
What This Costs
Almost everything here is free. GitHub Actions is free for public repos. Netlify’s free tier covers all the hosting I need. The only real cost is GitHub LFS.
The more significant cost was my time. Getting permissions right, understanding when tests needed to run, realizing I needed branch-based environments—that took a lot of trial and error. But as I learned, the incremental time it took for each new site or action got lower.
Now it runs without me. The pipeline updates daily, tests catch the problems that I care about the most, bad data never reaches production, and the website stays current.
Claude Code, if you count it as part of my stack, is by far the most expensive thing in it—but also the only reason I have working JavaScript.
This is a great post, with lots of good ideas for low cost hosting. I have solved most of these problems in a far less-cheap way, I have a Digital Ocean droplet (i.e. my own server in the cloud.)
But, having a server solves quite a few problems on the list: :
* I can build or copy parquet files or sqlite files on/to the server - avoiding the github limit
* I host 4 static sites on 4 different domains (and can add more when needed)
* For low-cpu requirement scripts, I run cron jobs on the server to rebuild databases / update dat - like running the bot that posts for my hurricane bot @nhc_atlantic_bot@vmst.io on Mastodton.
* For visualizations I can run Dash or Shiny apps (though I have no active shiny server running at the moment)
It's a little trickier for more ram/cpu hungry things - but have an always-on desktop machine home (my Mac Mini) and it runs more intensive scripts (like building the semantic similarity and search for recordedvote.org) and then copies that via scp to the server. Most people have laptops not desktops.
Similarly, my personal home page is quarto and complex enough I build on my Mac and sync to the server over ssh.
You are much better about staging / prod workflow. I think I tested a major rewrite of the backend of Recordedvote.org on an alternate domain name / branch? Maybe? But most of the time I test the Dash app on my Mac, and push to prod. 🙃 YOLO.
All this said, while this works for me, it requires a lot of linux server management skills that I think most data scientists would just as soon not acquire. Plus, the droplet is $14/mo - I have thought about moving to Hetzner to save some money but migration would be tedious.
For some reason, I'm like allergic to github actions. I'd rather fiddle with my cronjobs on my server than write YAML I guess?